Do you want to know how you can make personalized drinking glasses for your home or to give as a gift? This simple DIY can be done by anyone and the cost is minimal. You can etch wine glasses, tumblers, vases, casserole pans, jars, and so much more! You can use store-bought stencils or make your own using your cutting machine (Cricut) and vinyl. You can buy your glasses inexpensively at Dollar Tree! This project is fun, simple, and you end up with a product you’ll be proud to share!
In this blog post, my goal is to share photos of the glass-etching process along with simple directions, tips, and of course, a list of supplies needed.


Supplies Needed:
- Glasses (This is your choice: whatever you want to etch! Just keep in mind to use glasses that do not have any kind of protective color film and you can not etch anything made by Pyrex. It must be glass, not plastic. Dollar Tree glass items work very well!)
- Etching Cream (I use Armour Etch. This can be purchased from Amazon, Walmart, or Hobby Lobby where you can use your 40% off coupon!)
- Stencils (If you want to buy stencils, the best ones are the Armour Etch Over ‘N’ Over Stencils because they are reusable. These can be purchased from Hobby Lobby, Amazon, or A.C. Moore. However, if you have a Cricut, making your own stencils is as easy as 1, 2, 3!)
- Stencil Paint Brushes (You can purchase a set of 5 at Hobby Lobby for $4; however, you can use any paint brush that is round and bristly or you can use wooden craft sticks instead.)
- Clear Tape (You will need some clear Scotch tape for protecting the area around your stencil on your glass).
- Paper towels or something else to protect your work surface.
- Optional: gloves (It is recommended you do not touch the cream, but I have not found a need to use gloves for this project).
How-to-etch … let’s begin!
First thing I recommend is to gather all your supplies and get them ready to go and prepare your work surface. I use paper towels for my work surface. Make sure your sink is empty so it’s ready for rinsing. I recommend doing this project in the kitchen close to the sink. Have something to hold your glasses in place available. I used ice trays to hold my glasses in place so they wouldn’t roll while the etching cream was on them. Have a timer (or your phone) handy to time the etching process. Wash your glasses with warm soapy water and let dry prior to doing this project to make sure there is no residue on your glasses that could mess up the etching process.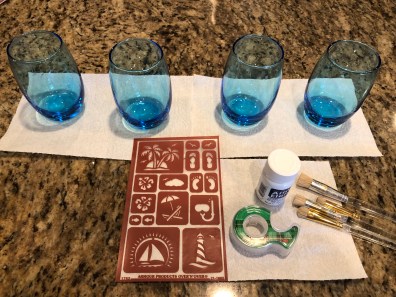
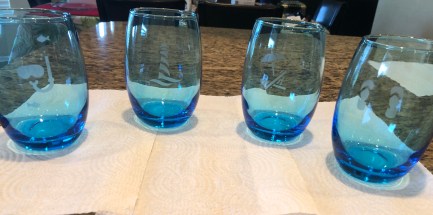
The blue glasses in the photo above were purchased at Dollar Tree (so just $4 to make a nice set of glasses). I decided to go with a Coastal theme. I purchased the stencil from Hobby Lobby and used my coupon.


Once you have everything set up, you are ready to put your stencils on your glasses. The Over ‘N” Over stencils are very easy to peel up and place on your glass. Just make sure to smooth them on and remove any creases or bubbles. If you are using a stencil you made with your cutting machine (such as a Cricut), you will use clear transfer tape and your scraper to apply the stencil to the glass product (see the plate photos above. The first photo shows what the stencil for small flowers for the edge look like before applying, the second one shows them on the plate, and the third one shows the vinyl stencil used in the center). After you apply the stencils, you will want to use the clear tape to seal the edges, this basically makes your stencil area larger and therefore keeps you from getting the cream on the rest of the glass.


It’s time for the fun part … time to apply the cream! I promise it’s easy, but read this and follow my suggestions for good results. You want to use a bristle brush (one that has a round end vs. a regular paint brush) or you can use a wooden craft stick. Hold your glass or have it laying in front of you on something to keep it from moving around (I used an ice tray covered by a paper towel). Dip your brush into the cream and scoop up a generous amount, but slide one side along the edge as you pull it out so it won’t drip. Apply the cream to the stencil by dabbing not brushing side to side. You want to sort of glob it on so that it is on fairly thick. When you are done, you shouldn’t be able to see through it to the glass. During this step, you need to be very careful not to drip the cream anywhere else on your glass (only on the stencil). Once you do it a couple of times, it becomes very easy! You can apply more tape around the edges of your stencil if you’d like to make sure you won’t drip. Now, set your timer. Armour Etch only recommends a couple of minutes, but after experimenting with this project a few times, I have found leaving it on longer works better. For the blue glasses, I let the cream sit for 20 minutes.


Time’s up! When your timer goes off, you will rinse the cream off the glasses. Have a paper towel or towel handy to place your stencils. I like to just use my fingers, but some people prefer to wear a glove or use a washcloth or paper towel for rinsing. Run the water as strong as it will go and place your glass under the flow with the glass facing down (see photos above) so the cream will go down into the drain and not all over your glass or sink. You want to rub as you rinse and make sure to remove all the cream from the stencil and glass. Then, pull off the stencils and place them on a paper towel to dry. Finally, rinse your glasses one more time and place in the drainer to dry. You saw the completed blue glasses in the beginning, below are some other items I have etched.


Tip: The good thing about the Over ‘N’ Over stencils is you can use them again and again. So if you want to make multiple sets of glasses, you can and if you mess up on your glasses, you can buy more Dollar Tree glasses and start again.
Tip: If you have a specific design, word, or logo you want on your glass, making your own stencil using your Cricut (or another cutting machine) is the way to go! The way you do this is to find your image in design space, then create a square and place your design on the square, Select All, then Slice it, the square with the sliced out design becomes your stencil. You can google ‘Slicing on Cricut’ and find multiple videos on YouTube.
Glass etching is a project I really enjoy. I first learned how to do it along with a group of ladies that live in my neighborhood (we have a monthly Craft Club). We all loved it so much that we did it a second time the following year. Now I find it’s something I can do it at home whenever I want to add a design to a glass project for home or for a gift! I hope you have enjoyed reading this blog post and that you have found it helpful to get you started with your next Glass Etching project. Please share your finished etching projects with me by commenting with a photo under my blog post on My Pinterest Page. Be sure to follow my blog to see other fun and easy DIY projects and/or follow my Facebook Page. Until next time, keep on craftin’! ~Kristina~

Love the glasses
LikeLiked by 1 person
Thank you!
LikeLike
?
LikeLike