If you live anywhere near a beach, you might be like me and have a desire to decorate your home with coastal-themed decor. Some of the decor in my home is the work of local artisans and photographers or gifts from family, but I’d have to say most of the decor was created by me. I love to craft and create things and I’m always trying something new! One of the projects I highly enjoyed is making seashell letters. I did this project a few years ago with some of the ladies in my neighborhood craft club.
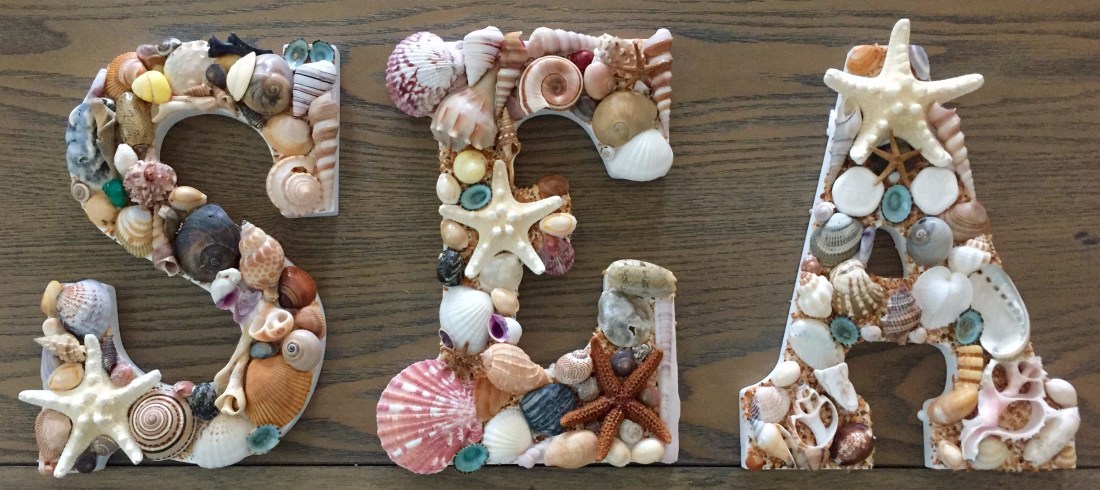
The photo above shows my finished letters, spelling out “sea” which I hung on my dining room wall (I will share another photo later). Most of the ladies in the group did just one letter, either the first letter in their first name or the first letter in their last name. A couple of the ladies also did shell frames. I chose to go all out and do a word.
Our ladies Craft Club meets once a month. We also have a walking club. So for this particular month, we decided to combine the two clubs and make it an adventure. We began our adventure by going on a beach walk at Flagler Beach (about 45 minutes south of St. Augustine). We had a good reason for choosing this beach … there is a great lunch spot close by (Turtle Shack Cafe) and next to it is an awesome shop that sells lots of SHELLS (Jose Gaspar Treasure Company).

The first part of our adventure was walking Flagler Beach. Some of ladies, stopped and collected shells and sand/coquina along the way. It was a beautiful day and a great way to get in some exercise!

After a nice long walk, we were hungry, so we headed down the street to one of fave spots, Turtle Shack Cafe. This photo is prior to the hurricanes (Matthew and Irma). They have since completed a little bit of renovations. Anyway, if you are ever in the area, I highly recommend this restaurant (great burgers and more!)


After lunch, we headed right next door to shop at a really quaint local gift shop. Jose Gaspar Treasure Company sells all kinds of gifts, souvenirs, jewelry, artwork, and shells. Many of the ladies already have a collection of shells from various beach walks where we live; however, we all wanted to purchase some shells that we can’t find on our beaches to spruce up our craft project. This store has a wide variety of shells at great prices! We enjoyed our time at the shop browsing all the neat products and chatting with the owner. I was so excited with the shells I bought, I couldn’t wait to get started on the shell letter project!


Later that week, craft club met and we began creating our masterpieces. Below, I will list basic supplies needed for this project. Above, you can see me in the first photo working on my letters. In the second photo, you can see some of the ladies working on their letters. Most of us chose to use the sand/coquina collected at the beach on our letters as a backdrop to the shells. I think it was a nice added touch!


Works in progress. You can see in the first photo above, I used the sand/coquina on my letters first, then began to glue my shells on top. The “R” above does not have the sand on first. You can see either option looks great!
SUPPLIES YOU NEED to complete this project
Wood letters (Michaels has a huge selection of letters in different sizes, and made from different types of wood, different colors, etc.) You can use unfinished wood, finished wood, white or black letters, even the cardboard letters. It is a personal choice!
Shells – You will want a variety of shells, shells of different sizes, shells of different colors. You can collect your own shells (just make sure to clean them prior to using them for this project). You can also purchase your shells from a Shell store, a craft store, online, etc.
Glue – I found that Tacky glue worked best for this project. However, you might have some stubborn shells that won’t stick, in that case, try E6000 glue or Hot Glue. Keep in mind, over time, if you live in a humid climate, hot glued items might come off.
Optional – sand, coquina, glitter, gems, any type of embellishment to add to your letters


Above are some of the finished projects. As you can see, they are all different. That is another thing that is so great about this project, no two are alike and they reflect your own personal style. Another awesome thing about this project is that anyone can do it! You do not need to be an artist or have artistic ability. Come on, we are talking about glueing shells to a letter … so easy. This project was so much fun and one that I highly enjoyed. It is a wonderful activity to do if you are looking for relaxation, sort of like coloring. I hope by sharing this with you, you might be inspired to use the shells you’ve collected and get creative!


Above, you can see how we hung the shell letters on the dining room wall vertically. This is just as you leave our dining area and go into our living room. These letters are one of my favorite decor items in our whole entire home. I have also used shells on other projects I’ve made, such as frames, wine glass tea-light holders, canvases, shadowboxes, ornaments, and more! Shell collecting is fun, but I think it’s even more fun to find creative ways to use and display your shells. If you enjoyed this post, give me a like and please share a photo of your shell letters with me on My Pinterest Page. I hope that you will follow my blog to see more fun projects! Until next time, keep on craftin’! ~Kristina~
More Coastal Projects:

Excellent! Keep shellin’ it out!
LikeLiked by 1 person
Thanks Tom:)
LikeLike
These are TOO cute! We’re taking a big family vacay to the beach in August and this would be so fun for my daughter to do!
LikeLiked by 1 person
Would be a great way to save memories from a trip:)
LikeLike
This cute and an special way to remember your trip!
LikeLiked by 1 person
Oh my gosh, these are so cute! Such an awesome idea. So looking forward to when I get my own place and I can make things like this for my house decor.
LikeLiked by 1 person
I love to make my own decor, not all of it, but I enjoy making things and it’s fun to see in your home and for others to enjoy as well:)
LikeLike
That is super cute and creative! What a fun project for the kinds.
LikeLiked by 1 person
When I was young, my family and I would collect shells in Florida and paint them! Excellent activity for the kids 🙂
LikeLiked by 1 person