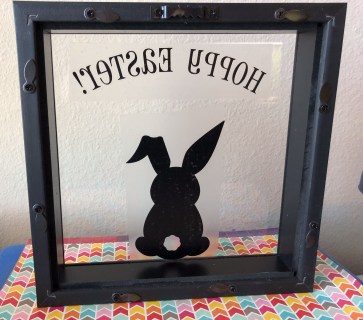
This is a simple, cute project you can make to use as an Easter-themed decoration for your home. Your kids can even help you make it! You only need a few supplies and you can personalize it to fit your style. Below is a photo of my shadowbox. I will show you step-by-step how I made it and give you tips and suggestions on making your own.

Supplies Needed:
- Shadowbox – You can purchase all different sizes and colors from various stores including Michaels, Hobby Lobby, JoAnn, AC Moore, Walmart, etc. (I had mine on hand, it was purchased from Michaels and it is an 8×8 shadowbox).
- Vinyl – I used black 651 permanent vinyl but you could use 631 as well since it is an indoor decoration.
- Easter grass – Any color, any style (I purchased mine from Dollar Tree).
- Fake eggs – You can purchase any kind of egg or other embellishments you would like to add in your shadowbox ( I found these eggs at Dollar Tree).
- Small pom-pom for the bunny tail (optional)

HOW TO MAKE THIS SHADOWBOX
Keep in mind, you can use a bigger shadowbox, a different color shadowbox, different embellishments, a different color of vinyl, etc.
The first thing you need to do is make your design that you will cut out with vinyl on your Cricut (or another cutting machine). Note: If you do not have a cutting machine, you could purchase a vinyl design to use (however, you would need to put it on the outside of the glass since it wouldn’t be mirrored). Below is a screenshot of my design. I purchased a bunny silhouette svg from Etsy then designed the wording (Pharmacy font from http://www.dafont.com). The square represents the size of my shadowbox so I could see how big to make my lettering and bunny.

Second, you need to cut out your design onto your vinyl. I mirrored my design (flipped it horizontally) because I wanted to place the vinyl design onto the inside of the glass facing out. The reason for this is so I can easily clean the outside of the glass when needed. Below is a video I created explaining the process of cutting out the design, this may be helpful for those that haven’t mirrored before.
The third thing you need to do is apply your vinyl design to the glass of the shadowbox. If you mirror it, you will place the design on the inside of the glass facing out. If you didn’t mirror it, the design will go on the outside of the glass facing you. Below are a few photos of the process of applying your design. If you are a Cricut owner, you’ve done this before.


Fourth, now you will do the fun part, adding the filling! This part can be a little tricky and takes a little patience. Lay your shadowbox down flat with the opening facing you. Begin to lay Easter grass at the bottom inside of the shadowbox. Then carefully lay your eggs or other embellishments where you would like them to go. Then you will start to fill up the rest of the box with the Easter grass, including behind the eggs. The eggs may move a little as you do this, so you will have to reach through and adjust as needed. Finally, you will place the backing of the shadowbox on and turn it around to see if you like the placement of the filling. If not, adjust until you are satisfied. When you are putting on the backing, the grass will definitely stick out all over (see photo below). That is okay. The simple fix is to trim the grass pieces hanging out after you secure the back onto the shadowbox.

Fifth, the final step, look at your amazing shadowbox (see first photo below) and decide if you want to add a pom-pom tail to the outside of the glass. If you decide to do so, just use a scrapbook glue/tape runner to adhere it (see second photo below). You’re done! One thing I might have done differently … make the lettering white.


As you can see reading through the process step by step, this is a very simple project. You could even let your kids help with filling the shadowbox. Shadowboxes are fun projects and make awesome decorations for various seasons and holidays. I have made many Christmas shadowboxes and I’ve also made beach-themed ones (I’ll save those for another blog sometime). If you enjoyed this post, give me a like and if you like craft projects, follow my blog and/or My Facebook page for more fun ideas! Please share photos of your finished projects on my Pinterest page as well. Until next time, keep on craftin’! ~Kristina~

OMG, this is so cute! I love Easter, and working on this beautiful craft with my kids is going to be such fun! Thanks so much for sharing!
LikeLiked by 1 person
Awesome and thanks! Hope you enjoy!
LikeLike
This is such a cute Easter DIY project! I love that you used your Cricut machine and added vinyl. I feel like so many people used shadow boxes to just put things inside, I think it’s so creative and unique that you added the vinyl to the glass.
LikeLiked by 1 person
Thanks so much! 🐰
LikeLike