
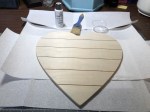
About a month ago I was in Target shopping and of course, I had to stop and browse the Dollar Spot section. It was just after Christmas, so I was surprised to see they already had some Valentine items out for sale. I saw the slatted wooden heart and had to have one! At the time, I had no idea what I would do with it … but hey, it was only $3.00.
After staring at the heart for almost a month, I decided what I wanted to do with it, lol. Sometimes crafting takes time. Anyway, I wanted to chalk paint it, sand it a little to make it look distressed, then add a phrase of some sort. I already had some chalk paint, sand paper, vinyl, and clear sealant on hand. So I had no additional costs for this project.
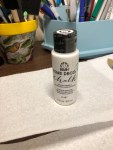
Chalk paint is very easy to use and you don’t need a lot. I put a little in a small cup and just painted the heart from side to side, covering the entire front surface. I let the paint dry for less than an hour, it dries quick! I didn’t do a second coat because I wanted to sand it so that some of the wood color would show through. You can certainly do a second coat and paint different colors and you could also stain the heart.
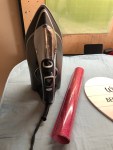
Next, I took the heart out to my garage and sprayed a light coat of sealant over the painted surface. This will protect the paint from peeling over time and it also helps the vinyl adhere to the wood better. (Note: some people prefer to make or use a stencil and paint on their lettering versus using cut out vinyl, which is totally fine, I was just going for a simple project for my day). The sealant also dries very quickly.

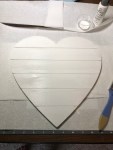
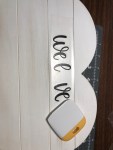
While my heart was das drying, I cut out the phrase I wanted on my Cricut onto black permanent vinyl (the words) and part of it on glitter iron-on vinyl (the hearts). You can certainly use any cutting machine to do this project, as well as, purchase vinyl decals from a craft store. I found the phrase on Cricut Design Space and it was free because I am an access member. I wanted the hearts to be either red or pink and I like glitter, so I thought I would try using glitter iron-on (I previously used iron-on vinyl on some wood ornaments at Christmas time). Because of the slats on the heart, I transferred the phrase line by line onto the heart, using clear contact paper. I ironed on the hearts after the words.
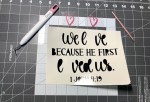
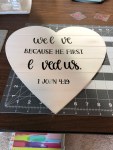

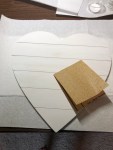
I liked how the heart turned out, but I felt like it still needed something else. I am also a scrapbooker, so I have a lot of scrapbook paper on hand. I decided I would find a decorative element I liked on Cricut Design Space and cut it out onto scrapbook paper. Then i would use Mod Podge to adhere it to the wooden heart. It is very easy to do, and it makes it look more complete and beautiful! I plan to attach a sawtooth hanger to the back of the heart and hang the heart on the wall in my home.

Target’s dollar spot always has some sort of wooden item for sale, usually it is something to go with the upcoming holiday or season. So the next time you are in Target, pick up a wooden decoration and create something beautiful! I hope you enjoyed this post, if so, give me a like, save it to Pinterest, or share it on social media. I would love to see what you make, so stop by My Pinterest Page and share a photo comment with me.
Until next time, remember God loves you and keep on craftin’! ~Kristina~

This is such a cute craft item. It looks like it was pretty easy. I think I will try this out. Thank you for sharing.
LikeLiked by 1 person
💕
LikeLike
What a great idea! I don’t shop at Target often, but now that I know about their dollar spot, I just might have to go shopping today!
LikeLiked by 1 person