Canvas prints are a fabulous way to decorate the walls of your home, but let’s face it, they can be very pricey. I have splurged on a few occasions and bought already made canvases (professional photographers) and I have also used online coupons (Groupon) to purchase canvases with my photos. I am pleased with both, however, I wanted to showcase more of my photos on the walls of our home without having to order them from a company. From this desire came the idea of making my own photo canvases.
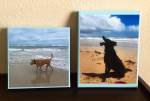
As I dove into the world of crafting, I came upon something called Mod Podge while doing another project. When I was younger, I remember doing decoupage projects. Mod Podge is basically like a watered-down glue, similar to what you would use for decoupage. I came upon several projects on Pinterest using Mod Podge and was intrigued. That’s when I decided I was going to attempt to make my own photo canvases. The first canvases I made were a success, so I just keep on making them! Below are photos of the first four I ever made, shells on the beach and a starfish on the beach, as well as, another starfish and a crab. I made two of them for my guest bathroom and the other two for our living room, both have a beachy theme. I shared these photos with my sister. She loved them so much, she wanted me to make some for her bathroom! That’s when I knew this is how I was going to showcase future photos on my wall.


Canvas (I generally just use canvases from Michaels, Artist’s Loft level 1 are fine but I have also used level 2 and level 3 … I find the difference is the paint goes on a little smoother the higher the level)
Acrylic Paint (just basic acrylic paint is fine, I like a satin finish)
Paint Brush to apply paint to edges of canvas
Photo (I generally get mine printed from Shutterfly and get a glossy finish)
Mod Podge (I prefer to use Gloss but Matte will work as well)
Foam Brush (this will be used for Mod Podge, it is best to use a brand new one)
Sawtooth hook
Here are some photos of sample supplies


- Prepare your workspace: I recommend laying down a cheap plastic tablecloth, some waxed paper, or some newsprint to protect your workspace.
- Gather all of your supplies. (list above) To start, you will need your canvas, your paint, and a paintbrush.
- Decide your background paint color: Look at your photo and pick out a color within your photo that will help your photo to stand out or you might pick a neutral color that will look good against the wall you are hanging the canvas (some might prefer to use the same color on all their canvases, possibly an off-white).
- Preparing your photo: Before painting, you will want to lay your photo out on top of your canvas and decide where you will need to trim. You want your photo to fit on top of the canvas centered, leaving just a little canvas showing all the way around the edges. I generally leave about a quarter of an inch or less. Decide how much you will need to trim off each edge. If you are using an 8×10 canvas with an 8×10 photo, you will only need to trim a little of each edge, but if you are using an 8×8 canvas with an 8×10 photo, the long side (10 inches) will need to be trimmed down quite a bit, a little over 2 inches, so keep that in mind when selecting your photos and canvases. I use a Fiskars paper-cutter to trim my photos. After trimming, lay your photo on the canvas to make sure it is straight and fits like you want (before painting and gluing!)
- Time to paint: This is simple, paint a coat of your paint color on all four edges of the canvas, as well, as about a half-inch or so on the surface of the canvas all the way around (see the photo below for reference). Let the first coat of paint completely dry before painting the second coat (this should not take that long, I usually wait a couple of hours). After you paint the second coat, the paint surface should look smooth and solid and ready to go! If not, you can always paint a third coat if needed.
- Attaching the photo: Do not do this step until the paint is thoroughly and completely dry. You do not want paint smudging or getting onto your photo. Sometimes I’ll wait until the next day to do this step, but if you paint in the morning, you should be fine to do this step in the evening. Have your Mod Podge and foam brush ready. It may help to put some Mod Podge in a small bowl for easier access. You will need to do this step fairly quickly so the Mod Podge doesn’t dry before applying the photo to the canvas. You can do this one of two ways, applying the Mod Podge to the photo or applying the Mod Podge to the canvas. I prefer the second way. Using your foam brush, apply a thin but generous amount of Mod Podge directly to the top surface of your canvas. Cover the whole surface where you will place the photo. As soon as you have it covered, carefully lay your photo on top. You can use a soft cloth (not your fingertips as they can leave prints on your photo) to apply light pressure to the photo to smooth around the edges and make sure it is securely sticking to the canvas. It will not take long to dry. If any of the edges are sticking up, you can use a small paintbrush to apply more Mod Podge underneath then apply pressure for about 30 seconds until it adheres.
- Sealing the photo and canvas: This is the step that might make you nervous, but I assure you, it is very easy and for the most part forgiving so don’t worry about being perfect. Again, you will need to do this fairly quickly because the Mod Podge will begin to dry almost instantly. Make sure you are using a foam brush that is smooth (no rough edges) and hasn’t been used for anything except Mod Podge. This will help protect your photo. Once your photo is securely attached to your canvas (photo doesn’t move), you can seal your photo and canvas with Mod Podge. I like to use the Gloss version so that the completed canvas looks shiny. The best way for me to describe how to do this is to imagine you are painting over your photo and you want to have straight even coats, not clumps, or smears. So you will go from top to bottom or bottom to top or side to side with your strokes (pick one!) I usually like to go top to bottom with my strokes. Put a generous amount of Mod Podge on your foam brush and start at the top left corner of your canvas and brush down to the bottom in a straight line. If you don’t make it it’s okay, just get some more Mod Podge and finish your stroke. You will continue to do this same pattern all the way across. Its’ totally okay to overlap because you want to make sure you cover the complete surface. Just make sure you don’t have clumps. It should look like your photo is covered in glue but you should be able to see the photo through it. Don’t worry, it will dry clear, I promise! I learned over time, doing it over and over, what works best, but even my very first canvases came out just fine. Mod Podge is a wonderfully easy medium to use. I also go over the painted edges of the canvas with Mod Podge to seal the paint. Let it dry for a day!
- Hanging your canvas: I have found the easiest and cheapest way to hang my canvases is to use a sawtooth hanger. You can purchase these at the Craft or Hardware store. They are very easy to attach. Just line up the hook in the back center top of your canvas along the wood and attach with the 2 little nails.
Here are a few photos that illustrate the painted edges and what the photo looks like when you first apply the Mod Podge.


I have canvas, I have Mod Podge. I MUST try this!! Thanks for sharing.
LikeLiked by 1 person
Yay! Please share a pic when you do!
LikeLiked by 1 person
I can see this to be a great idea for making personalized gifts for special birthdays and occasion too! Love it.
LikeLiked by 1 person
Yes, gifts would be great!
LikeLike
I love that you took a pricey service and learned how to do it yourself! These will make fabulous gifts around the holidays as well. Thanks for sharing your tutorial!
LikeLiked by 1 person
I’ve just started thinking about my Christmas lists this year, and these would make great gifts! Can’t wait to try them out!
LikeLiked by 1 person
Awesome Sarah!
LikeLike
Hi, I love your blog and that’s why I have nominated you for the Liebster Award! Congratulations🎉🏅for more information follow this link https://marsaalamdesertretreat.com/2018/08/07/liebster-award-nomination/travel/
LikeLiked by 1 person
Thank you!!
LikeLike
So I just copy from your blog all the info but plug in my answers and my nominations? I’m new to all this. Is there a time frame, just not sure if I will have time to do it.
LikeLike
Hi sorry I didn’t get back to you sooner, just found this message in spam!😕. Yes you can do that if you like or just put a link to my site or the globalaussie site for the official rules. Then yes put your own information, nominations and questions to your nominations. They choose the winners on the 31st December so you’ve got plenty of time. Take your time any problems refer to https://theglobalaussie.com/liebster-award-2018/or get back to me if you need any help at all. You’ll be fine. Wonderful that you are rising to the challenge 🤗🤗🤗
LikeLiked by 1 person
I’ve never created one myself but will definitely be trying one out. Thanks for sharing , great post!
LikeLiked by 1 person
Thanks for the comment, would love to see your completed canvas:)
LikeLike
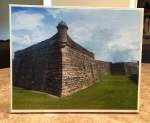
This is soooo cool. I visited St. Augustine and the two top photos are very similar to some I took. I cannot wait to try this! Thank you so much for sharing!
LikeLiked by 1 person
Awesome! When did you visit St. Augustine? Where are you from? Thanks for your comment, I’d love to see a pic if you decide to make a canvas:)
LikeLiked by 1 person
I will post it for sure! I was in St. Augustine a few years ago. We actually worked on an historic home there. But I just loved it so much. One day we saw what I could have sworn were parrots on the phone lines! I am from Ohio but I live in Newnan, Georgia. 🙂
LikeLiked by 1 person
Actually, there are parrots on the island. I haven’t seen them but I know many have posted about seeing them:)
LikeLiked by 1 person
aaahhhh so I WAS right! My husband had said there was no way I had seen parrots. Well. Well. hahahahahahahaha. They were on the lines on the outskirts of the water. it has been so long that is all I remember besides seeing the boats from that road. lol.
LikeLiked by 1 person