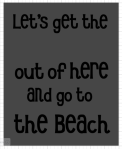
If you live in Florida, like me, or another coastal town around the country or world, you probably like going to the beach. You might also enjoy decorating your home with Coastal-themed decor. I love beachy decor and I really like to make my own decor, as much as possible. One of the cute signs I made a few years ago was a canvas (see below) with the saying “Let’s Get the Shell Out of Here and Go to the Beach.” I love this saying! So cute! After making this though, I found the colors didn’t really go with my downstairs decor and someone gave me the idea of just using the actual shell to represent the word shell so I decided I wanted to make a new sign. This time instead of using a canvas, I used a wooden plaque (see the second photo below). I am going to share with you what materials I used and how to make this wooden sign (but I’ll also share how I did the canvas for those that would rather do it that way).


Materials:
- Wooden plaque (or canvas) – Mine is the ArtMinds brand from Michaels
- Sandpaper (different grades to smooth the surface and edges as needed)
- Primer paint (I used Rust-oleum Painters Touch white, 2 in 1 paint and primer)
- Acrylic Paint (I painted my surface using satin acrylic paint in white, grey, and a light turquoise blue. You can use any colors you choose).
- Paintbrushes and foam brushes
- Mod Podge
- Stencil (I created my stencil using 813 Stencil Vinyl and my Cricut, but you could also buy letter stencils)
- Stencil Vinyl, Clear Contact Paper, Scraper, Scissors, Weeding Tool (You will need these items if you are working with Stencil Vinyl and your Cricut).
- Shell (and any other embellishments you want to add).
- E6000 glue
- Clear Matte Spray

How to Make:
- Sand. The first thing you need to do is sand the wood. For the most part, the wooden plaques from Michaels are paint ready, but I sanded the surface in areas that looked a little rough and around all the edges.
- Prime. Set up an area outside or in a ventilated area to spray paint your plaque with the primer paint. I like to do this because it fills in and covers any blemishes and makes painting with the acrylic paint on the wood much smoother.

- Dry. Let the primer paint dry completely before moving on. (this is a good time to prep the rest of your materials and make your stencil if needed).
- Paint. Now it’s time to get creative and create the background for your sign using your acrylic paints. I painted mine a thin layer of white first. While it was still wet, I added several strokes of gray and then used a foam brush to blend it in. Then I added several strokes of the light blue and blended those in with a foam brush and voila! done! I left the trim in just white.

- Dry. Let this completely dry to the touch.
- Seal. Next, you want to seal the paint. I used Mod Podge, just one thin coat using a foam brush. This will help your paint from peeling when you use your stencil vinyl to paint wording and it also keeps your surface smooth for painting your wording.

- Dry. Let the Mod Podge dry (doesn’t take too long). Prep your stencils and paint.
- Create. If you are making your own stencil using your Cricut (or another cutting machine), I recommend 813 Stencil Vinyl. It works great! You can use regular vinyl but you do take more of a risk peeling up paint. The Font I used for my sign is called Cherry Limeade from Cricut Design Space. (More on making stencil below). If you are using store-bought letters, it may take a little more time and patience doing one letter at a time.

- Apply and Paint. Now it’s time to paint the wording onto your wooden plaque using your stencils. If you are using the cut-out stencil vinyl, you will want to apply and paint one line at a time to allow drying time (reduces the risk of smudging and messing up your sign). Apply the stencil using clear contact paper and your scraper. Make sure to smooth it on and that there are no air bubbles around the lettering to prevent paint from seeping under the stencil. If you are using a store-bought stencil, I recommend using painters tape around the edges. I recommend using foam brushes to blot your paint on instead of stroking it on with a brush. This will help keep paint from seeping under your stencil. You will only need to blot on one layer of your acrylic paint. I used black paint but you can use any color.
- Dry. Allow the paint on the wording to mostly dry but not all the way. Before it’s all the way dry, carefully lift and remove the stencil. Don’t worry if you have little spots that leaked, you can do touch-ups later.

- Remove. If you used the stencil vinyl, you will also need to remove the middles of the letters, such as the circle in an “o”. You can easily do this using a sharp pointy weeding tool or pointy tweezers (see in the photo above).
- Dry. Let your lettering dry completely before moving on.
- Touch-ups! Let’s face it, it’s hard to do something like this and it comes out perfect unless you’ve done it so many times, and you’ve figured out what works best. So use a small tip paintbrush and use your background color to go around any areas on your letters where there are smudges or your letters aren’t crisp.

- Attach. Before gluing on your shell or any other embellishments, you will want to attach a sawtooth hook or another hook for hanging your sign to the wall.
- Adhere. Now its time to glue on your shell and anything else you want to add. I like to use E6000 glue but you could use other strong holding glues as well. Let this dry completely before hanging.


- Seal. You will probably be hanging your decor inside, so this is optional. You can seal your project easily with a light spray coat of clear matte spray.
- Hang and enjoy!
Canvas option: As I mentioned before, the first sign I made was on a canvas, not a wooden plaque. This is a little trickier but it’s lightweight and has a little bit of a different look. If you use a canvas, I recommend 8×10 or larger. This one is done a little differently. You will paint the entire canvas the color you want the wording to be first. Then instead of a stencil, you will cut out the wording on vinyl (I recommend 651) to apply to the canvas. To help the vinyl stick to the canvas, you can spray a light coat of matte spray or apply a light coat of Mod Podge. Apply the lettering, then you will paint over it using the color you want to be the background. Completely paint over the lettering. Let it dry but not completely. Just before its completely dry, you will carefully use a weeding tool to pull up all the lettering. The base color will now show. Let dry completely then add your hook to the back and your shell to the front. Voila!
Cricut peeps: If you are a Cricut user, you probably already know how to make a stencil, but in case you don’t, there are tons of videos on YouTube that can help. The gist of it is: you create your text and get it to the size you want (save it and then move to the next step). You will want to work on just one line at a time (hide the others). Weld the line, then create a box (rectangle) over top of it, leaving space all around. Move the shape to the back so you can see the lettering. Then “select all” and “slice”. Move the sliced pieces out of the way and there you have your stencil. Do this with each line, then save your stencils under a new name.

I hope you have enjoyed reading this blog post and learning about a simple Coastal Sign you can make for your home or for a gift! You can recreate a similar sign using any phrase you like! For more fun crafting DIY’s be sure to check out my other blog posts, my Pinterest Page, or my Facebook page. Until next time, keep on craftin’! ~Kristina~

Hahaha, love the play on words. This is such a cute idea. Great tutorial, you simplify the process so well.
LikeLiked by 1 person
Thanks! I love the saying and I feel that way often!
LikeLike
I have family and friends who share your sentiment of the beech. I, too, have a Cricut. Your tutorial is thorough and explicit. I now have a gift idea.
LikeLiked by 1 person
That’s great! The Cricut is awesome, isn’t it:)
LikeLiked by 1 person
This is so cute and simple! I love how easy it was and DIY’s are the best. Def up my alley!
LikeLiked by 1 person
That’s so cute! My mom loves beach decor, so I might have to try my hand at making her something like this 😊
LikeLiked by 1 person
Thanks! I’m sure your mom would love it!
LikeLike
So fun! You make me want to get our my Cricut 🙂
LikeLiked by 1 person
They are fun to have, love mine!
LikeLike
Love the puns! Will try this out as I’m thinking of a beach theme for my classroom! Thanks for this !
LikeLiked by 1 person
💕
LikeLike
Love this! Can’t believe how easy this looks to make. Great end result!
LikeLiked by 1 person
Thanks so much!
LikeLike
Such a cute and simple idea! ♥
LikeLiked by 1 person
One of my faves! 😎
LikeLiked by 1 person