Christmas is coming and I love making ornaments! How about you? If you didn’t see my first Christmas Ornament blog post, be sure to go back and check it out! It’s all about making Glitter Ornaments. In this post, I am going to share with you a few of my favorite Floating Ornaments I have made along with some tips for making them.


Supplies needed:
Glass Ball Ornaments (optional: plastic) – these can be purchased at any craft store, as well as Walmart or Amazon
A sheet of Acetate (I purchased mine off of Amazon)
The vinyl design you created or stickers and/or photo(s)
Optional – embellishments to put inside the ornament
Ribbon to hang your ornament
Scissors (you might also use a circle cutter if you have one to cut your photo)
Here are two links you can use if you have a Cricut!
3″ Ornament in Cricut Design Space
4″ Ornament in Cricut Design Space
General Directions:
- Decide what you want to put inside of your ornament, then either create it with your Cricut or Silhouette, go find it at a Craft Store, or print a photo to use.
- Cut out your ornament shape from the sheet of Acetate. If you do not have a cutting machine, you could find a stencil or print an ornament shape from the Internet, then trace and cut. You want your ornament shape to be just slightly smaller than your actual ornament, so it will fit inside and appear to be floating. I recommend using either 3 or 4-inch ornaments.
- Adhere your design or photo to the acetate ornament. If using a vinyl design, you can use any transfer method you like. If you are using stickers, just stick them on the acetate directly. For photos, I recommend using a glue or tape runner, making sure to apply glue/tape all the way around the edge of the photo. If you are using a photo, you can make another circle out of paper for the backside and write on it or even put another photo! For example, if you used a photo from a vacation, you might put the location and date on the backside.
- Insert the acetate ornament into the glass ornament. Carefully roll your acetate vertically until it is a size that will fit into the opening of the ornament. Stick the rolled up acetate into the glass ornament, bottom first. Hold onto the top part of the acetate ornament as you are doing so to make sure it goes in correctly. Once it is in the ornament ball, you can use tweezers or Cricut weeder to straighten it out in the ball. Sometimes it helps to put a small glue dot at the top opening to hold the acetate in place, but usually not necessary.
- Embellish away! You can add a name or saying with vinyl on the outside of the vinyl if you used a photo. You can add ribbon, bells, snow, glitter, whatever you like, get creative!
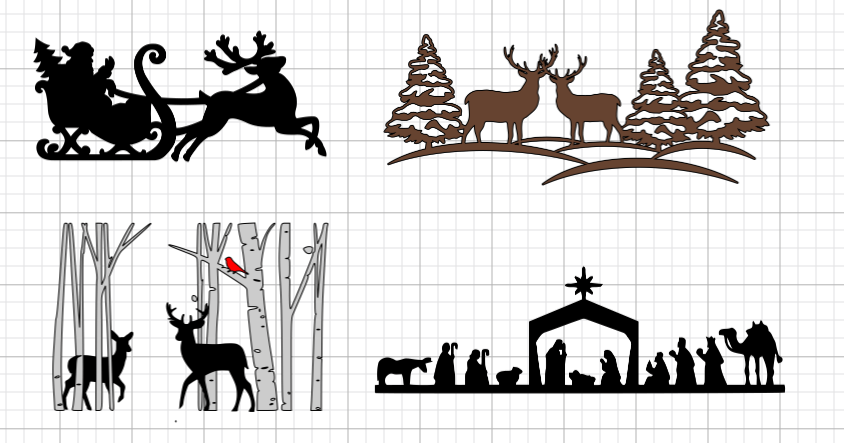
In the photo above are some design examples I have found that could be used inside of an ornament. When using Santa and his reindeer, you could make them look as if they were flying through the sky. You might add fake snow to the bottom of your ornament or even star decals on the outside. With the two deer scenes, you could use different color vinyl or just black and then add fake snow to the bottom of the ornament, so it looks like the deer are standing in the snow. With the Nativity design, you could just use the manger with Joseph, Mary, and Baby Jesus or the whole thing, and you could put hay/straw in the bottom of your ornament and maybe even a star decal on the top of the outside. If you search “Floating Ornament” on Google and click on “images”, you will see tons of ideas. You can also search on Pinterest or YouTube. I hope my blog has at least inspired you to get creative and give making your own ornaments a try! Follow my blog to see more craft tutorials like this and please go over to my Pinterest page and share your completed project photos with me. Thanks for stopping by! Kristina
Update: Just made this Bigfoot ornament and had to share! So much fun!


Your baubles look great.
GG
LikeLiked by 1 person
Where do you live, if you don’t mind me asking:) Baubles is not a common word here, but love it!
LikeLike
Love the Bigfoot ornament I have a father-in-law and grandson that are obsessed with him! Can I get instructions please? Awesome idea
Thank you
LikeLiked by 1 person
I made with a plastic ornament that comes apart. I made Bigfoot using my Cricut, with vinyl and attached it to a cutout acetate ornament I cut out with Cricut. Glued down tree inside, added Bigfoot and some snow:)
LikeLike
These are so cute and festive for Christmas! Thanks for the ideas 🙂
LikeLiked by 1 person
You’re welcome!
LikeLike
Great idea for my little’s this Christmas. Do you think 3 is too young to have do this?
LikeLiked by 1 person
You can certainly help the 3 year old:)
LikeLike
Great ideas for ornaments. I love this. I shared as well. Thanks for this post.
LikeLike
Thanks for sharing!
LikeLike
Sounds like such a cool idea and easy enough for someone like me to make!
LikeLiked by 1 person
I love projects that everyone can enjoy!
LikeLike
Lovely christmas decorations. I have to make some as I realised all our decorations have not arrived with an overseas move. Thanks for sharing!
LikeLiked by 1 person
You’re welcome!
LikeLike
Such good tips, these would make for great personalized christmas gifts ❤
LikeLiked by 1 person
😊
LikeLike
These are adorable, my husband would like the- You will shoot your eye out kid ornament. LOL
LikeLiked by 1 person
Yea, one of my faves:) And the one with kid with tongue stuck to pole.
LikeLike
Ive never actually made my own baubles before. I’ve thought about it but never got round to it. Think you might have convinced me to give it a go. Thanks!
LikeLiked by 1 person
Im looking forward to trying this with my kids this Christmas.
LikeLiked by 1 person
😊
LikeLike
Thanks for sharing! I appreciate the cut files on DS as well 🙂
LikeLiked by 1 person
I think your glass ordiments are beautiful very well made and have a lovely effect thank you.
LikeLiked by 1 person
Thanks so much Karina! I’m glad you like them! 💜
LikeLike