Fall is in the air and Halloween is on the horizon … which means it is time to get busy making Christmas and Winter decor! I like to have a couple of months to work on projects to decorate my home for the holidays as well as make decor to give as gifts. One of my favorite things to do is see if I can create something beautiful starting with something from the Dollar Store. A technique that I love to use for ornaments is the basis of this particular project: glittering! Who doesn’t love glitter? I think snowmen are so much fun to make. You can make snowmen out of socks, snowmen out of wood, snowmen out of fabric, and even make snowmen out of glass. Even though I live in Florida, I still like snowmen! I have made a few of these snowmen and I am currently finishing up one for a gift, so I am going to share with you how to make them and how you can personalize them and add your own personal flair! Enjoy!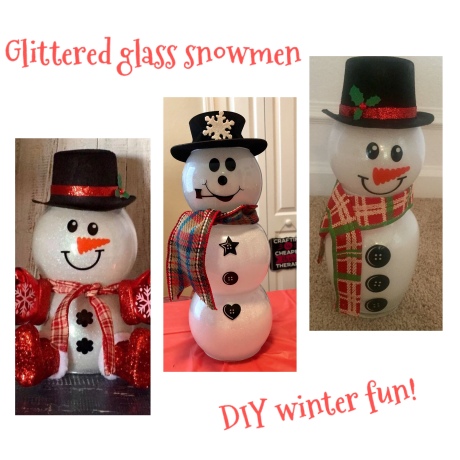
What you need to get started:
- Glass bowls/domes from the Dollar Tree (or another store). You can use 2 bowls, 1 bowl, and 1 vase, or 3 bowls (2 of the same size and 1 smaller)
- White fine or extra-fine glitter
- Polycrylic (I use the Minwax BRAND)
- Tablecloth or waxed paper to protect your work surface
- Something for your bowls to drain and dry (I used a dish drainer from DT)
- E600 Glue to glue together glass bowls (I used Aleene’s Tacky Glue for hat)
- Hat (I purchased them from Hobby Lobby and JoAnn)
- Vinyl pieces for face and buttons (I created mine on my Cricut)
- Ribbon (for scarf and hat decor)
- Embellishments for hat
- Optional: mittens and boots (you can find these sometimes as ornaments at DT)
- Optional: lights (you can use battery-operated tea lights, votives or other lights)
- Matte Clear Enamel Spray


How to make:
- Clean your glass bowls inside and out. You need to make sure there is no dust or residue before glittering and decorating. I usually wash with warm soapy water.
- Glitter the inside of your glass bowls/domes/vases. I recommend using fine white glitter which you can purchase at any of the craft stores. Look at the photos below to see a visual on how to glitter your bowls, along with written directions below.
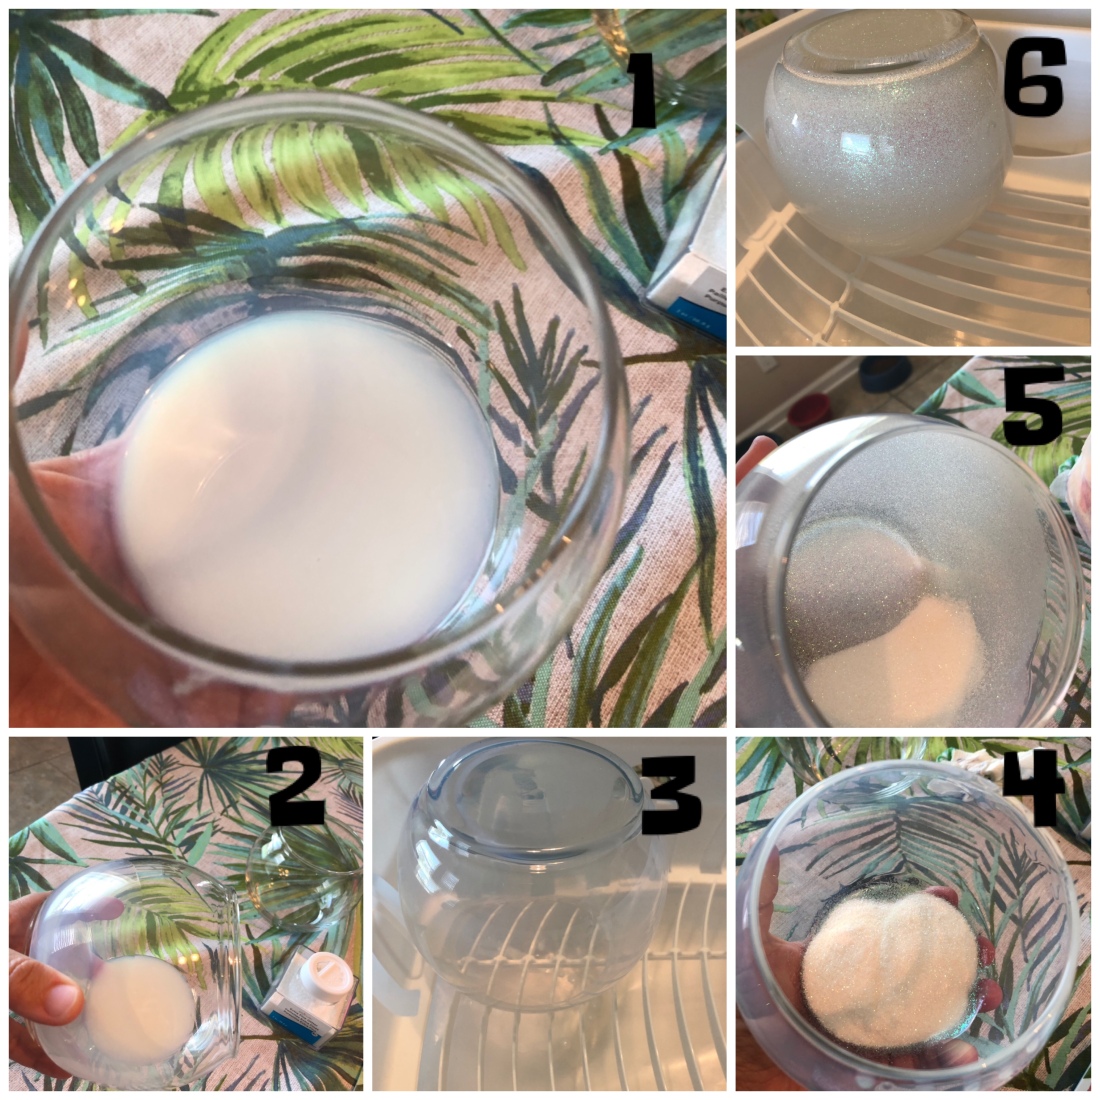
- Pour some Polycrylic into the bowl and slowly swirl it around and around to cover all the area of the glass in the bowl.
- As you reach the top, you will need to have a cup or the Polycrylic container available to pour out the excess.
- Turn your glass bowl upside down into a cup, or muffin pan, or drainer to allow the excess liquid to drip out. Leave it there for a minute or two.
- Pour in a scoop of glitter to the bottom of your bowl that has the Polycrylic while it is still wet but make sure there are no globs.
- Just as you swirled around the Polycrylic, you will swirl around your glitter, making sure to cover all areas of the glass in your bowl, pouring out the excess as you reach the top.
- Turn your glass bowl upside down into your drying surface and allow it to fully dry. I usually leave it for about 24 hours. Repeat the above steps with all the glass bowls.
- Spray the inside of the glass bowls with a clear matte spray. This will help seal the glitter and keep the glitter from falling off over time.
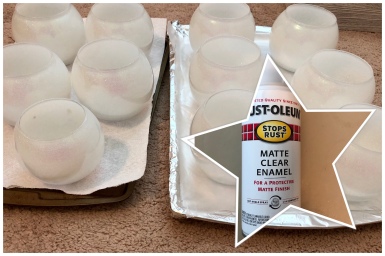
- Give the spray about 24 hours to dry then you are ready to move on.
- Glue your bowls together to create your snowman shape. See the photos below for the direction of opening. If you want to place lights in your snowman, you will want an opening at the bottom and an opening at the top. Let dry completely.


- Create the vinyl design for the face and buttons or purchase vinyl design/stickers. I created my design in Cricut Design Space and then cut it out using 651 permanent vinyl. You can use what is available on CDS or purchase a snowman face svg from Etsy or another online design store. When creating your design, make sure to measure the available space on the glass bowl so you don’t make your face too big or too small. (Look at photos below supply list for sample face designs)
- Apply the facial design and buttons. I use clear contact paper and a scraper to transfer my vinyl design to the glass bowl. Align it and start in the center then smooth your design from the center out to avoid any creases/wrinkles.
- Decorate the snowman’s hat. You can use ribbon, cord, raffia, burlap, snowflakes, holly, flowers, just about anything you want on your hat. Just use a strong glue to adhere your embellishments.
- Make a scarf. I like to use a wide ribbon for the scarf with or without wiring but I find the wiring helps in shaping your scarf. You can also use felt, fabric, or burlap. I measure and cut the ribbon then tie it on loosely between the head and body of the snowman. You may choose to glue it down to make sure it stays in place, but this is not necessary. You can also embellish your scarf with jewels, snowflakes, buttons, monogram letters, etc.
- Add the lights and secure the hat (loosely, not permanently). If you plan to have a light in the head of the snowman, then you will not want to glue on the hat permanently. I use some scrapbook adhesive glue on the edges of the head to make the hat stay in place but it’s easy enough to remove to turn the light on and off. For the bottom light, you simply pick up your snowman and place underneath.

Above you can see two photos of the snowman I just finished today! The photo of the left is without lights and the photo on the right is with the tealights in the head and underneath the body. Below are photos of my design on CDS, and the materials I used to decorate her hat and make the scarf. I hope you enjoyed reading this and learning how to make your very own snowmen … which I’d love to see when you do! So be sure to stop by My Pinterest Page and comment with a photo underneath my blog post pin or one of my snowmen pins. Keep in touch with me on My Facebook Page as I hope to post another Christmas craft blog post soon! Until next time, keep on craftin’! ~Kristina~


This is adorable!!! Saving this so I can try it. 💕
LikeLiked by 1 person
Thanks and great!
LikeLiked by 1 person
Super cute!! I love these!! I am sharing in my upcoming Sunday Social (10/6) post!! Thanks for the great idea!
LikeLiked by 1 person
😍 THANKS so much!!
LikeLiked by 1 person
These are adorable!! Thank you for sharing 🙂
LikeLiked by 1 person
Thanks!! Of course:)
LikeLike
Note to all: if ya plan on making Christmas gifts & haven’t started yet it’s not too late 😃
Thanks for your post!
LikeLiked by 1 person
Super cute!
LikeLiked by 1 person
Thanks😊
LikeLiked by 1 person
This is adorable!! ♥
LikeLiked by 1 person
Thanks so much! 😊
LikeLiked by 1 person